Object Detection Inference
整理 torchvision 预训练检测器的使用与输入要求,以及缩放、填充后把检测框映射回原图并与相机参数配合的方法
深度学习系列:第 18 篇,共 23 篇
用 PyTorch 从搭建模型、训练、调试到部署的一组笔记。按下面的顺序阅读,后面的文章会直接引用前面讲过的内容
- PyTorch Fine-Tuning
- Object Detection
- Object Detection Inference
- Image Segmentation
- Keypoint Detection
- Generative Models
Object Detection整理了检测模型内部的各个组成部分。这里整理把检测器用起来时要处理的事情:怎样调用预训练模型、输入要满足什么要求,以及网络输入上的检测框怎样换算回原始图像的坐标
使用预训练检测器
推理
torchvision.models.detection提供了在 COCO 上预训练的检测模型,后处理已经包含在模型内部,输出直接是最终的检测结果
| 模型 | 类型 | 特点 |
|---|---|---|
fasterrcnn_resnet50_fpn_v2 | 两阶段,锚框 | 精度高,速度慢 |
fasterrcnn_mobilenet_v3_large_320_fpn | 两阶段,锚框 | 轻量,适合 CPU |
retinanet_resnet50_fpn_v2 | 单阶段,锚框 | 使用焦点损失 |
fcos_resnet50_fpn | 单阶段,无锚框 | 回归到四条边的距离 |
ssdlite320_mobilenet_v3_large | 单阶段,锚框 | 最轻量 |
为了让结果可以重复,下面用代码画一张合成的街景作为测试图像,左边是红绿灯,右边是停车标志
1
2
3
4
5
6
7
8
9
10
11
12
13
14
15
16
17
18
19
20
21
22
23
24
25
26
27
28
29
import math

from PIL import Image, ImageDraw


def make_scene(width=512, height=600):
    """画一张合成的街景:左边是红绿灯,右边是停车标志"""
    image = Image.new('RGB', (width, height), (150, 190, 225))  # 天空
    draw = ImageDraw.Draw(image)
    draw.rectangle([0, 430, width, height], fill=(120, 125, 130))  # 路面

    # 红绿灯:灯杆、灯箱和三盏灯,只有红灯亮
    draw.rectangle([100, 330, 120, 490], fill=(60, 60, 60))
    draw.rounded_rectangle([60, 60, 160, 330], radius=20, fill=(35, 35, 35))
    for center_y, color in zip([105, 195, 285], [(230, 40, 40), (90, 80, 20), (20, 80, 30)]):
        draw.ellipse([78, center_y - 32, 142, center_y + 32], fill=color)

    # 停车标志:立柱、白边和红色的八边形
    def octagon(radius):
        return [(340 + radius * math.cos(math.radians(22.5 + 45 * k)), 230 + radius * math.sin(math.radians(22.5 + 45 * k))) for k in range(8)]

    draw.rectangle([334, 230, 346, 520], fill=(170, 170, 170))
    draw.polygon(octagon(140), fill=(255, 255, 255))
    draw.polygon(octagon(129), fill=(200, 25, 30))
    return image


if __name__ == '__main__':
    make_scene().save('scene.png')
1
2
3
4
5
6
7
8
9
10
11
12
13
14
15
16
17
18
19
20
21
22
23
24
25
import torch
from torchvision.models.detection import FasterRCNN_MobileNet_V3_Large_320_FPN_Weights, fasterrcnn_mobilenet_v3_large_320_fpn
from torchvision.transforms.functional import pil_to_tensor

from scene import make_scene

weights = FasterRCNN_MobileNet_V3_Large_320_FPN_Weights.DEFAULT
model = fasterrcnn_mobilenet_v3_large_320_fpn(weights=weights)
model.eval()

image = make_scene()  # 合成的街景,宽 512、高 600
x = pil_to_tensor(image).float() / 255  # (3, H, W),取值范围 [0, 1]
print(x.shape)  # torch.Size([3, 600, 512])

with torch.no_grad():
    outputs = model([x])  # 输入是图像的列表,每张图像的大小可以不同

output = outputs[0]       # 每张图像对应一个字典
for key, value in output.items():
    print(key, value.shape, value.dtype)

categories = weights.meta['categories']
keep = output['scores'] > 0.5
for box, label, score in zip(output['boxes'][keep], output['labels'][keep], output['scores'][keep]):
    print(f'{categories[label]:15s}{score:.3f}  {[round(v) for v in box.tolist()]}')
1
2
3
4
5
6
torch.Size([3, 600, 512])
boxes torch.Size([2, 4]) torch.float32
labels torch.Size([2]) torch.int64
scores torch.Size([2]) torch.float32
stop sign      0.997  [215, 96, 471, 359]
traffic light  0.965  [54, 52, 165, 342]
| 键 | 形状 | 含义 |
|---|---|---|
boxes | (K, 4) | xyxy格式的绝对坐标,属于输入图像的坐标系 |
labels | (K,) | 类别编号,用weights.meta['categories']查名称 |
scores | (K,) | 置信度分数,已经从高到低排列 |
模型默认返回分数高于 0.05 的所有结果。这张合成图像很干净,只返回了 2 个框;真实图像上会有很多低分的误检,使用前需要按分数再过滤一次。阈值根据应用决定:漏检代价高时调低,误检代价高时调高
输入的要求
| 输入 | 结果 |
|---|---|
| 取值在 0 到 1 之间的浮点张量 | 正确,检测到 stop sign 和 traffic light |
| 取值在 0 到 255 之间的浮点张量 | 不报错,没有返回任何检测结果 |
| 自己先做了 ImageNet 的标准化 | 不报错,stop sign 的分数降到 0.979,traffic light 降到 0.276,按 0.5 过滤后漏检 |
uint8张量 | 抛出TypeError |
模型内部已经包含标准化和缩放,输入只需要除以 255。 重复做标准化或者忘记除以 255 都不会报错,只是结果不对,这是使用这些模型时最常见的错误
- 输入是三维张量的列表而不是一个四维张量,列表中的图像大小可以不同,模型内部会缩放并填充成一个批次
- 类别表共 91 项,编号 0 是
__background__,中间有若干N/A占位,实际只有 80 个类别。在自己的数据集上微调时,类别编号同样要从 1 开始,0 留给背景 - 必须调用
model.eval()。训练模式下模型的调用方式是model(images, targets),返回的是各项损失的字典而不是检测结果 - 训练时
targets中的边界框为xyxy格式的绝对坐标,宽或高为 0 的框会直接抛出AssertionError,数据增强后要把这样的框去掉
创建模型时可以修改后处理的参数
| 参数 | 默认值 | 含义 |
|---|---|---|
box_score_thresh | 0.05 | 低于该分数的结果不返回 |
box_nms_thresh | 0.5 | 非极大值抑制的 IoU 阈值 |
box_detections_per_img | 100 | 每张图像最多返回的结果个数 |
坐标映射
缩放与填充
检测网络的输入大小是固定的,相机图像需要先缩放。torchvision的检测模型在内部完成缩放,并把结果映射回原图;而自己做预处理的模型(导出为 ONNX 的模型、YOLO 系列)输出的坐标属于缩放后的图像,需要自己映射回去
| 方式 | 做法 | 映射回原图 |
|---|---|---|
| 直接拉伸 | 宽和高分别缩放到目标大小 | $x$和$y$分别除以各自的缩放比例 |
| 等比例缩放加填充 | 按较小的比例缩放,不足的部分用灰色填充 | 先减去填充量,再除以同一个缩放比例 |
直接拉伸会改变目标的宽高比,1920x1080 的图像拉伸成正方形后,目标在水平方向被压扁近一半。等比例缩放加填充(letterbox)保持宽高比不变,是 YOLO 系列的默认做法
1
2
3
4
5
6
7
8
9
10
11
12
13
14
15
16
17
18
19
20
21
22
23
24
25
26
27
28
29
30
31
32
33
34
35
36
37
38
39
40
41
42
import torch
import torch.nn.functional as F


def letterbox(image, size, fill=0.5):
    """把 (3, H, W) 的图像等比例缩放后填充到 size x size,返回新图像、缩放比例和左上角的填充量"""
    height, width = image.shape[1:]
    scale = min(size / height, size / width)
    new_height, new_width = round(height * scale), round(width * scale)
    resized = F.interpolate(image[None], size=(new_height, new_width), mode='bilinear', align_corners=False)[0]

    pad_left = (size - new_width) // 2
    pad_top = (size - new_height) // 2
    padding = (pad_left, size - new_width - pad_left, pad_top, size - new_height - pad_top)  # 左、右、上、下
    return F.pad(resized, padding, value=fill), scale, (pad_left, pad_top)


def to_letterbox(boxes, scale, pad):
    """原图上的框 -> 网络输入上的框:先缩放再平移"""
    offset = torch.tensor([pad[0], pad[1], pad[0], pad[1]])
    return boxes * scale + offset


def to_original(boxes, scale, pad, original_size):
    """网络输入上的框 -> 原图上的框:先减去填充再除以缩放比例,最后裁剪到图像范围内"""
    offset = torch.tensor([pad[0], pad[1], pad[0], pad[1]])
    boxes = (boxes - offset) / scale
    height, width = original_size
    boxes[:, 0::2] = boxes[:, 0::2].clamp(0, width)
    boxes[:, 1::2] = boxes[:, 1::2].clamp(0, height)
    return boxes


if __name__ == '__main__':
    image = torch.rand(3, 1080, 1920)  # 1920x1080 的相机图像
    resized, scale, pad = letterbox(image, 640)
    print(resized.shape, scale, pad)  # torch.Size([3, 640, 640]) 0.3333333333333333 (0, 140)

    boxes = torch.tensor([[600., 300., 1200., 900.]])
    mapped = to_letterbox(boxes, scale, pad)
    print(mapped)                                         # tensor([[200., 240., 400., 440.]])
    print(to_original(mapped, scale, pad, (1080, 1920)))  # tensor([[ 600.,  300., 1200.,  900.]])
映射回原图时的顺序与预处理相反:预处理是先缩放再平移,还原时先减去填充量再除以缩放比例。顺序弄反或者忘记减去填充,得到的框会整体偏移,而且偏移量随图像的宽高比变化,在正方形的测试图像上发现不了
在检测器上验证
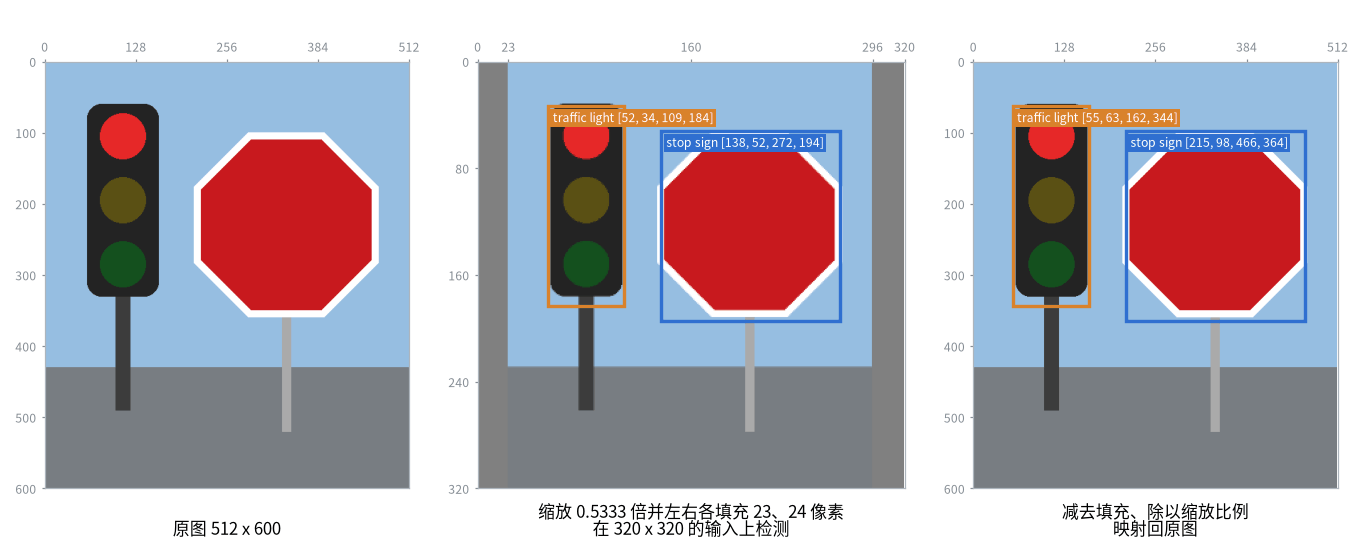
把同一张图像直接送入检测器,和先填充到 320x320 再检测并映射回原图,两种方式得到的框应当基本一致
1
2
3
4
5
6
7
8
9
10
11
12
13
14
15
16
17
18
19
20
21
22
23
import torch
from torchvision.models.detection import FasterRCNN_MobileNet_V3_Large_320_FPN_Weights, fasterrcnn_mobilenet_v3_large_320_fpn
from torchvision.transforms.functional import pil_to_tensor

from letterbox import letterbox, to_original
from scene import make_scene

weights = FasterRCNN_MobileNet_V3_Large_320_FPN_Weights.DEFAULT
model = fasterrcnn_mobilenet_v3_large_320_fpn(weights=weights, box_score_thresh=0.5)
model.eval()

image = make_scene()
x = pil_to_tensor(image).float() / 255      # (3, 600, 512)
resized, scale, pad = letterbox(x, 320)
print(resized.shape, round(scale, 4), pad)  # torch.Size([3, 320, 320]) 0.5333 (23, 0)

with torch.no_grad():
    direct = model([x])[0]['boxes']        # 直接在原图上检测
    boxes = model([resized])[0]['boxes']   # 在填充后的图像上检测,坐标属于 320x320 的图像

print(boxes.round())
print(to_original(boxes, scale, pad, x.shape[1:]).round())
print(direct.round())
1
2
3
4
5
6
7
torch.Size([3, 320, 320]) 0.5333 (23, 0)
tensor([[138.,  52., 272., 194.],
        [ 52.,  34., 109., 184.]])
tensor([[215.,  98., 466., 364.],
        [ 55.,  63., 162., 344.]])
tensor([[215.,  96., 471., 359.],
        [ 54.,  52., 165., 342.]])
三组结果依次为 320x320 输入上的框、映射回原图后的框、直接在原图上检测的框。后两组最多相差 11 个像素,是因为两次送入网络的图像本身不同
与相机参数配合
相机的内参是在原始分辨率下标定的,用检测框计算目标的方位角或进行测距之前,必须先把框映射回原图的坐标系(或者把内参按同样的缩放和平移进行换算)。视场角与焦距的关系见Field of View
1
2
3
4
5
6
7
8
9
10
11
import math

# 1920x1080 的相机,水平视场角 90 度,主点在图像中心
width, fov = 1920, 90
fx = width / 2 / math.tan(math.radians(fov) / 2)  # 以像素为单位的焦距
cx = width / 2

box = [600, 300, 1200, 900]  # 原图坐标系下的检测框
u = (box[0] + box[2]) / 2    # 框中心的横坐标
angle = math.degrees(math.atan((u - cx) / fx))
print(round(fx, 1), round(angle, 2))  # 960.0 -3.58,目标在光轴左侧 3.58 度
如果直接使用 640x640 输入上的坐标,框中心的横坐标是 300,按原图的内参会算出 -34.51 度,结果完全错误