Image Segmentation
整理图像分割的任务类型、掩码格式与数据增强、U-Net 的实现、交叉熵与 Dice 损失、训练与评价指标、推理后处理,以及 torchvision 预训练分割模型的使用
深度学习系列:第 18 篇,共 22 篇
用 PyTorch 从搭建模型、训练、调试到部署的一组笔记。按下面的顺序阅读,后面的文章会直接引用前面讲过的内容
- PyTorch Fine-Tuning
- Object Detection
- Image Segmentation
- Keypoint Detection
- Generative Models
图像分割对图像中的每一个像素做分类。与Object Detection中用矩形框描述目标不同,分割的结果能精确到目标的边界,代价是标注、模型输出和后处理都以像素为单位,数据处理中的错误也更隐蔽:插值方式用错、图像和掩码没有同步变换,都不会报错,只会让模型学到错误的标签
分割任务的类型
| 任务 | 输出 | 能否区分同类的不同个体 | 常用模型 |
|---|---|---|---|
| 语义分割 | 一张类别图,每个像素一个类别编号 | 不能 | FCN、U-Net、DeepLab |
| 实例分割 | 每个目标一个二值掩码、一个类别和一个分数 | 能,只处理可数的目标 | Mask R-CNN、YOLO 的分割版 |
| 全景分割 | 每个像素一个类别编号,可数的目标再加实例编号 | 能 | Panoptic FPN、Mask2Former |
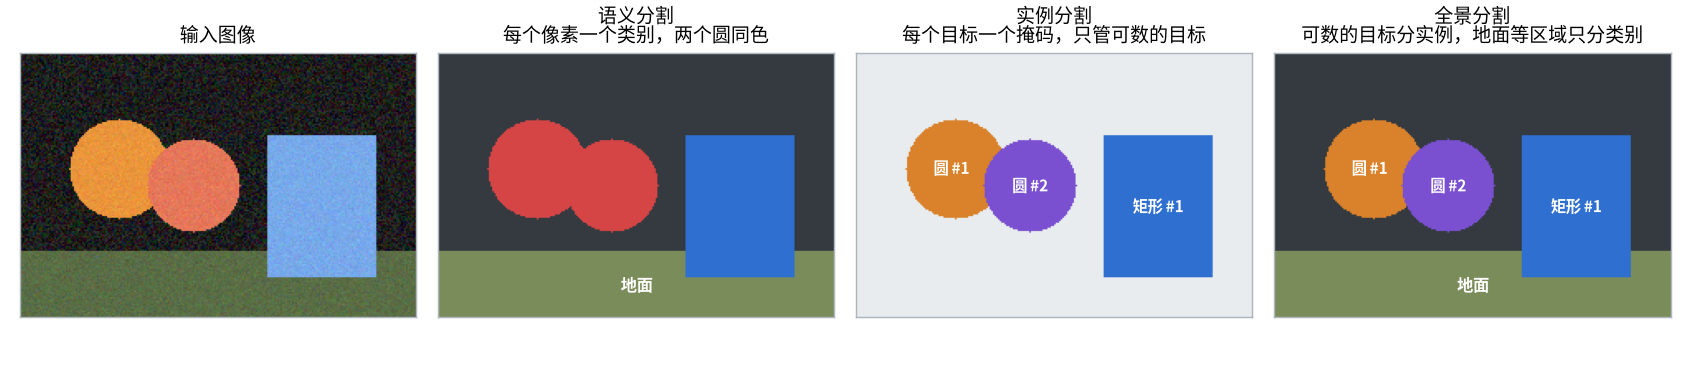
- 语义分割把两个相互接触的圆画成同一种颜色,只知道这些像素是圆,不知道有几个
- 实例分割可以看作检测的延伸:先找到每个目标,再在框内预测掩码。它只关心人、车这类可数的目标(things),天空、地面、道路这类不可数的区域(stuff)不输出
- 全景分割把两者合并:每个像素都有类别,属于可数目标的像素还有实例编号
本文以语义分割为主,它是另外两种任务的基础。实例分割在torchvision.models.detection中有maskrcnn_resnet50_fpn,输出格式与检测模型相同,只是每个目标多一个masks字段
标注与数据
示例数据集
下文用一个合成的数据集演示完整的流程:64x64 的噪声背景上随机画 1 到 3 个圆、矩形或三角形,颜色随机,模型只能从形状判断类别。数据集在内存中生成,不需要下载,保存为shapes.py供后面的代码导入
1
2
3
4
5
6
7
8
9
10
11
12
13
14
15
16
17
18
19
20
21
22
23
24
25
26
27
28
29
30
31
32
33
34
35
36
37
38
39
40
41
42
43
44
45
46
47
48
49
50
51
52
53
54
55
56
57
58
59
import cv2
import numpy as np
import torch
from torch.utils.data import Dataset

CLASSES = ['背景', '圆', '矩形', '三角形']


def make_sample(rng, size=64):
    """生成一张图像和它的掩码。image: (size, size, 3) uint8,mask: (size, size) uint8"""
    image = rng.integers(0, 80, (size, size, 3)).astype(np.uint8)  # 噪声背景
    mask = np.zeros((size, size), np.uint8)
    for _ in range(rng.integers(1, 4)):  # 1 到 3 个图形,后画的会遮挡先画的
        cls = int(rng.integers(1, 4))
        cx, cy = (int(v) for v in rng.integers(10, size - 10, 2))
        w, h = (int(v) for v in rng.integers(5, 10, 2))  # 半宽和半高
        shape = np.zeros((size, size), np.uint8)
        if cls == 1:
            cv2.circle(shape, (cx, cy), w, 1, -1)
        elif cls == 2:
            cv2.rectangle(shape, (cx - w, cy - h), (cx + w, cy + h), 1, -1)
        else:
            points = np.array([[cx, cy - h], [cx - w, cy + h], [cx + w, cy + h]])
            cv2.fillPoly(shape, [points], 1)
        # 颜色是随机的,类别只能从形状判断
        image[shape == 1] = rng.integers(120, 256, 3)
        mask[shape == 1] = cls
    noise = rng.normal(0, 12, image.shape)
    image = np.clip(image + noise, 0, 255).astype(np.uint8)
    return image, mask


class ShapesDataset(Dataset):
    def __init__(self, length, seed):
        rng = np.random.default_rng(seed)
        samples = [make_sample(rng) for _ in range(length)]
        self.images = np.stack([s[0] for s in samples])  # (length, 64, 64, 3) uint8
        self.masks = np.stack([s[1] for s in samples])   # (length, 64, 64) uint8

    def __len__(self):
        return len(self.images)

    def __getitem__(self, index):
        image = torch.from_numpy(self.images[index]).permute(2, 0, 1).float() / 255  # (3, 64, 64),0 到 1
        mask = torch.from_numpy(self.masks[index]).long()                            # (64, 64),int64
        return image, mask


if __name__ == '__main__':
    dataset = ShapesDataset(1600, seed=0)
    image, mask = dataset[0]
    print(image.shape, image.dtype)  # torch.Size([3, 64, 64]) torch.float32
    print(mask.shape, mask.dtype)    # torch.Size([64, 64]) torch.int64
    print(mask.unique())

    # 各个类别的像素所占的比例
    counts = np.bincount(dataset.masks.ravel(), minlength=len(CLASSES))
    for name, ratio in zip(CLASSES, counts / counts.sum()):
        print(f'{name} {ratio:.1%}')
1
2
3
4
5
6
7
torch.Size([3, 64, 64]) torch.float32
torch.Size([64, 64]) torch.int64
tensor([0, 1, 3])
背景 92.2%
圆 2.5%
矩形 3.4%
三角形 1.8%
背景占了 92% 的像素,这是分割数据的常态,后面的损失函数和评价指标都要考虑这一点
掩码的格式
| 格式 | 形状 | 数据类型 | 用途 |
|---|---|---|---|
| 类别索引图 | (H, W) | 整数,取值为类别编号 | 标注文件、cross_entropy的标签 |
| one-hot | (C, H, W) | 0 或 1 | 计算 Dice 损失、多标签分割 |
| 二值掩码 | (H, W) | bool 或 0/1 | 单个类别或单个实例,实例分割的输出 |
| 调色板 PNG | (H, W) | uint8,带调色板 | Pascal VOC 等数据集的标注文件 |
忽略标签通常取 255:图像边缘、目标之间难以判断的边界、旋转后填充的区域标为 255,计算损失和指标时跳过这些像素
1
2
3
4
5
6
7
8
9
10
11
12
13
14
15
16
17
18
19
20
21
22
23
24
25
26
27
28
29
30
31
32
33
34
35
36
import cv2
import numpy as np
import torch
import torch.nn.functional as F
from PIL import Image

from shapes import make_sample

image, mask = make_sample(np.random.default_rng(0))
print(image.shape, image.dtype)  # (64, 64, 3) uint8
print(mask.shape, mask.dtype)    # (64, 64) uint8
print(np.unique(mask))           # [0 1 3],这张图像中有背景、圆和三角形

# 类别索引图 -> one-hot:(H, W) -> (H, W, C) -> (C, H, W)
index = torch.from_numpy(mask).long()
onehot = F.one_hot(index, num_classes=4).permute(2, 0, 1)
print(onehot.shape, onehot.dtype)             # torch.Size([4, 64, 64]) torch.int64
print(onehot.sum(dim=0).unique())             # tensor([1]),每个像素只属于一个类别
print(torch.equal(onehot.argmax(dim=0), index))  # True,argmax 可以还原

# 某一个类别的二值掩码
circle = index == 1
print(circle.shape, circle.dtype, circle.sum().item())

# 掩码必须用无损格式保存:JPEG 压缩会改变像素值,也就改变了类别编号
_, png = cv2.imencode('.png', mask)
_, jpg = cv2.imencode('.jpg', mask)
print(np.unique(cv2.imdecode(png, cv2.IMREAD_GRAYSCALE)))  # [0 1 3]
print(np.unique(cv2.imdecode(jpg, cv2.IMREAD_GRAYSCALE)))

# 调色板 PNG(Pascal VOC 的标注格式):用 PIL 读到的是类别编号,用 OpenCV 读到的是颜色
palette = Image.fromarray(mask, mode='P')
palette.putpalette([0, 0, 0, 128, 0, 0, 0, 128, 0, 128, 128, 0])
palette.save('mask.png')
print(np.unique(np.array(Image.open('mask.png'))))                         # [0 1 3]
print(np.unique(cv2.imread('mask.png').reshape(-1, 3), axis=0).tolist())  # BGR 颜色
1
2
3
4
5
6
7
8
9
10
11
(64, 64, 3) uint8
(64, 64) uint8
[0 1 3]
torch.Size([4, 64, 64]) torch.int64
tensor([1])
True
torch.Size([64, 64]) torch.bool 219
[0 1 3]
[0 1 2 3 4]
[0 1 3]
[[0, 0, 0], [0, 0, 128], [0, 128, 128]]
- 用 JPEG 保存的掩码读回来多出了 2 和 4 两个类别:有损压缩会在边界附近产生新的像素值,掩码必须保存为 PNG
- 调色板 PNG 中存的是类别编号,显示出来是彩色的。用
PIL读取得到编号;用cv2.imread读取会按调色板转换成 BGR 颜色,得到的不是类别编号
插值方式
缩放图像时常用双线性插值,它在相邻像素之间取加权平均。对掩码这样做,两个类别的交界处会出现介于两者之间的数值,取整后就是其他类别的编号
1
2
3
4
5
6
7
8
9
10
11
12
13
14
15
16
17
18
19
20
21
22
import torch
import torch.nn.functional as F
from torchvision import tv_tensors
from torchvision.transforms import v2

# 只有背景(0)和三角形(3)两个类别的掩码
mask = torch.zeros(64, 64, dtype=torch.uint8)
mask[16:48, 16:48] = 3

# 错误:按图像的方式用双线性插值放大
x = mask[None, None].float()  # interpolate 要求 (N, C, H, W) 的浮点张量
bilinear = F.interpolate(x, size=(100, 100), mode='bilinear', align_corners=False).round().long()
print(bilinear.unique().tolist(), torch.bincount(bilinear.flatten()).tolist())

# 正确:最近邻插值
nearest = F.interpolate(x, size=(100, 100), mode='nearest').long()
print(nearest.unique().tolist(), torch.bincount(nearest.flatten()).tolist())

# torchvision 的变换把普通张量当作图像处理,同样是双线性插值
print(v2.functional.resize(mask[None], [100, 100]).unique().tolist())
# 包装成 tv_tensors.Mask 之后自动使用最近邻插值
print(v2.functional.resize(tv_tensors.Mask(mask), [100, 100]).unique().tolist())
1
2
3
4
[0, 1, 2, 3] [7308, 192, 196, 2304]
[0, 3] [7500, 0, 0, 2500]
[0, 1, 2, 3]
[0, 3]
原本只有背景(0)和三角形(3)的掩码,用双线性插值放大后,在两者的交界处多出了 192 个标为 1(圆)和 196 个标为 2(矩形)的像素,模型会被要求在三角形的边上预测出圆和矩形。最近邻插值只会复制已有的值,不会产生新的类别
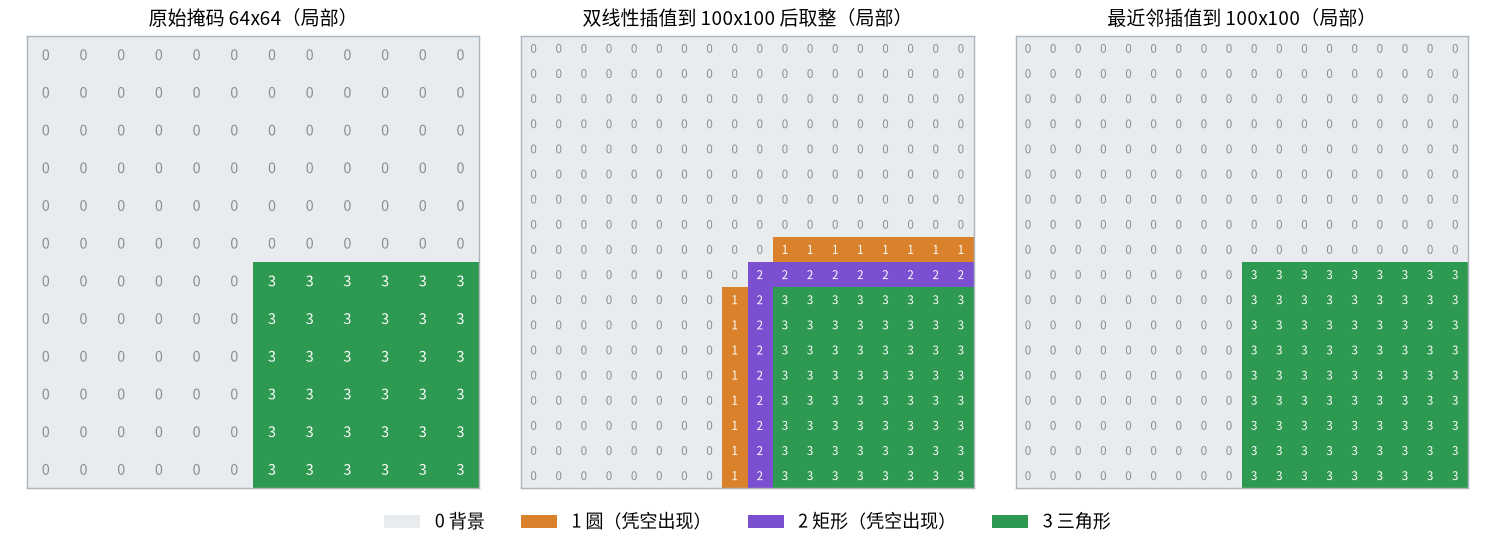
torchvision.transforms.v2根据输入的类型决定插值方式:普通张量和tv_tensors.Image当作图像,用双线性插值;tv_tensors.Mask当作掩码,自动改用最近邻插值
同步的几何变换
数据增强中的几何变换(裁剪、翻转、旋转、缩放)必须对图像和掩码使用同一组随机参数,颜色变换(亮度、对比度、模糊)只作用于图像。transforms.v2的做法是把图像和掩码在同一次调用中传入,各自包装成对应的tv_tensors类型
1
2
3
4
5
6
7
8
9
10
11
12
13
14
15
16
17
18
19
20
21
22
23
24
25
26
27
28
29
30
31
32
33
34
35
36
37
38
39
40
41
42
43
44
45
46
47
48
49
50
51
import numpy as np
import torch
from torchvision import tv_tensors
from torchvision.transforms import v2

from shapes import make_sample

image, mask = make_sample(np.random.default_rng(0))
image = tv_tensors.Image(torch.from_numpy(image).permute(2, 0, 1))  # (3, 64, 64) uint8
mask = tv_tensors.Mask(torch.from_numpy(mask))                      # (64, 64) uint8

transform = v2.Compose([
    v2.RandomResizedCrop(64, scale=(0.5, 1.0)),  # 几何变换:图像和掩码使用同一组随机参数
    v2.RandomHorizontalFlip(),
    v2.RandomRotation(15, fill={ tv_tensors.Image: 0, tv_tensors.Mask: 255 }),  # 旋转后露出的区域在掩码中填 255
    v2.ColorJitter(brightness=0.3, contrast=0.3),  # 颜色变换:只作用于图像
    v2.ToDtype({ tv_tensors.Image: torch.float32, tv_tensors.Mask: torch.int64 }, scale=True),
])

torch.manual_seed(0)
out_image, out_mask = transform(image, mask)
print(type(out_image).__name__, out_image.shape, out_image.dtype)
print(type(out_mask).__name__, out_mask.shape, out_mask.dtype)
print(mask.unique().tolist(), '->', out_mask.unique().tolist())


def agreement(image, mask):
    """图形比背景亮:统计“像素是否明亮”与“掩码是否为前景”一致的比例,用来检查图像和掩码是否对齐"""
    bright = image.max(dim=0).values > 115
    return ((mask > 0) == bright).float().mean().item()


print(f'{agreement(image, mask):.4f}')

# 正确:图像和掩码一起传入,使用同一组随机参数
crop = v2.RandomCrop(32)
torch.manual_seed(0)
crop_image, crop_mask = crop(image, mask)
print(f'{agreement(crop_image, crop_mask):.4f}')

# 错误 1:对图像和掩码分别调用,两次调用的随机参数不同
torch.manual_seed(0)
crop_image, crop_mask = crop(image), crop(mask)
print(f'{agreement(crop_image, crop_mask):.4f}')

# 错误 2:掩码是普通张量。有 tv_tensors.Image 在场时,其余的普通张量被原样返回,不做任何变换
flip = v2.RandomHorizontalFlip(p=1.0)
plain_mask = mask.as_subclass(torch.Tensor)
flip_image, flip_mask = flip(image, plain_mask)
print(torch.equal(flip_mask, plain_mask), f'{agreement(flip_image, flip_mask):.4f}')
1
2
3
4
5
6
7
Image torch.Size([3, 64, 64]) torch.float32
Mask torch.Size([64, 64]) torch.int64
[0, 1, 3] -> [0, 1, 3, 255]
1.0000
1.0000
0.8428
True 0.7627
ToDtype对图像缩放到 0 到 1 的浮点数,对掩码只转换类型(int64是cross_entropy要求的标签类型),scale=True不会作用于掩码- 旋转后露出的角落在图像中填 0,在掩码中填 255。如果掩码也填 0,这些黑色区域会被当作背景参与训练
agreement检查的是图形区域与掩码前景是否重合,原图上为 1。一起传入时裁剪后仍然是 1;分别调用时两次裁剪的位置不同,降到 0.8428- 普通张量和
tv_tensors.Image一起传入时,transforms.v2把普通张量当作不需要变换的附加数据原样返回。图像翻转了,掩码没有,也不会有任何警告
这类错误不会报错,训练也能进行,只是指标始终上不去。 写好数据管道后,把增强后的图像和掩码叠加画出来检查一遍,比任何单元测试都直接
模型结构
编码器与解码器
分类网络通过不断下采样得到一个全局的特征向量,分割需要的是与输入同样大小的输出。分割网络通常分为两部分:
| 部分 | 作用 | 分辨率的变化 |
|---|---|---|
| 编码器 | 提取特征,通常就是去掉分类头的分类网络 | 逐步缩小 |
| 解码器 | 把特征放大回输入的分辨率,对每个像素做分类 | 逐步放大 |
深层特征语义强但分辨率低,直接放大 8 倍或 32 倍得到的边界很粗糙。U-Net 在每一次上采样之后,把编码器中同分辨率的浅层特征拼接进来,用来恢复细节。上采样与拼接的形状计算见PyTorch CNN中的上采样拼接一节
一个小型 U-Net
下面的 U-Net 有 3 次下采样,基础通道数为 16。最后的 1x1 卷积把通道数变为类别数,输出形状为 (N, C, H, W),即每个像素一组未归一化的分数(logits)
1
2
3
4
5
6
7
8
9
10
11
12
13
14
15
16
17
18
19
20
21
22
23
24
25
26
27
28
29
30
31
32
33
34
35
36
37
38
39
40
41
42
43
44
45
46
47
48
49
50
51
52
53
54
55
56
57
58
59
60
61
62
63
64
65
66
67
68
import torch
import torch.nn as nn


class DoubleConv(nn.Sequential):
    """两个 3x3 卷积,不改变高度和宽度"""

    def __init__(self, in_channels, out_channels):
        super().__init__(
            nn.Conv2d(in_channels, out_channels, 3, padding=1, bias=False),
            nn.BatchNorm2d(out_channels),
            nn.ReLU(inplace=True),
            nn.Conv2d(out_channels, out_channels, 3, padding=1, bias=False),
            nn.BatchNorm2d(out_channels),
            nn.ReLU(inplace=True),
        )


class UpBlock(nn.Module):
    def __init__(self, in_channels, skip_channels, out_channels):
        super().__init__()
        self.up = nn.ConvTranspose2d(in_channels, in_channels // 2, kernel_size=2, stride=2)
        self.conv = DoubleConv(in_channels // 2 + skip_channels, out_channels)

    def forward(self, x, skip):
        x = self.up(x)                   # 高度和宽度放大 2 倍
        x = torch.cat([x, skip], dim=1)  # 与编码器中同分辨率的特征拼接
        return self.conv(x)


class UNet(nn.Module):
    def __init__(self, in_channels=3, num_classes=4, base=16):
        super().__init__()
        # 编码器:每下采样一次,通道数翻倍
        self.enc1 = DoubleConv(in_channels, base)
        self.enc2 = DoubleConv(base, base * 2)
        self.enc3 = DoubleConv(base * 2, base * 4)
        self.bottleneck = DoubleConv(base * 4, base * 8)
        self.pool = nn.MaxPool2d(2)
        # 解码器:每上采样一次,通道数减半
        self.dec3 = UpBlock(base * 8, base * 4, base * 4)
        self.dec2 = UpBlock(base * 4, base * 2, base * 2)
        self.dec1 = UpBlock(base * 2, base, base)
        # 1x1 卷积把通道数变为类别数,每个像素得到一组分类的 logits
        self.head = nn.Conv2d(base, num_classes, kernel_size=1)

    def forward(self, x):
        e1 = self.enc1(x)                     # (N, 16, H, W)
        e2 = self.enc2(self.pool(e1))         # (N, 32, H/2, W/2)
        e3 = self.enc3(self.pool(e2))         # (N, 64, H/4, W/4)
        b = self.bottleneck(self.pool(e3))    # (N, 128, H/8, W/8)
        d3 = self.dec3(b, e3)                 # (N, 64, H/4, W/4)
        d2 = self.dec2(d3, e2)                # (N, 32, H/2, W/2)
        d1 = self.dec1(d2, e1)                # (N, 16, H, W)
        return self.head(d1)                  # (N, num_classes, H, W)


if __name__ == '__main__':
    model = UNet()
    x = torch.randn(2, 3, 64, 64)
    print(model(x).shape)  # torch.Size([2, 4, 64, 64])
    print(sum(p.numel() for p in model.parameters()))

    # 高度和宽度必须能被 8 整除(3 次下采样),否则拼接时尺寸对不上
    try:
        model(torch.randn(2, 3, 100, 100))
    except RuntimeError as e:
        print(e)
1
2
3
torch.Size([2, 4, 64, 64])
482788
Sizes of tensors must match except in dimension 1. Expected size 24 but got size 25 for tensor number 1 in the list.
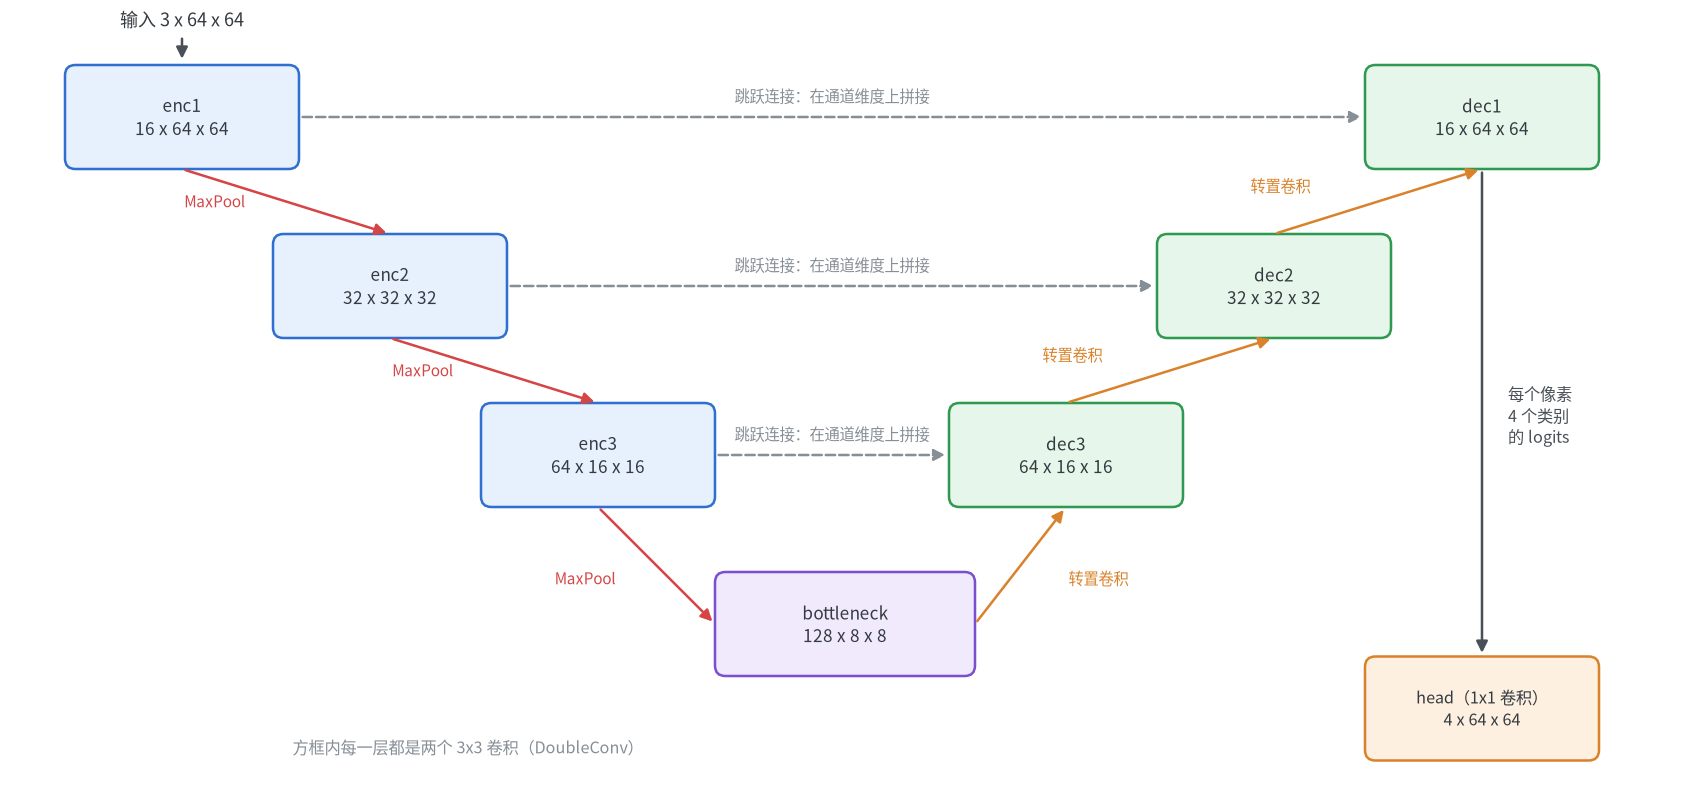
100x100 的输入在第 3 次池化后变成 12x12,放大回来是 24x24,与编码器中 25x25 的特征无法拼接。常见的处理方式是把输入填充到 8 的倍数,推理后再裁掉;或者在拼接前用F.interpolate把上采样的结果缩放到与跳跃连接相同的尺寸
其他结构与 torchvision 中的模型
| 结构 | 思路 |
|---|---|
| FCN | 把分类网络的全连接层换成卷积,直接把最后的特征图放大到原图 |
| U-Net | 对称的编码器和解码器,每一级都有跳跃连接,适合小数据集 |
| DeepLab | 用空洞卷积代替部分下采样,ASPP 模块用不同膨胀率的卷积并行提取多尺度特征 |
| LR-ASPP | 为 MobileNetV3 设计的轻量分割头,适合移动端 |
torchvision.models.segmentation中提供的预训练模型:
| 函数 | 骨干网络 | 输出字典中的键 |
|---|---|---|
fcn_resnet50、fcn_resnet101 | ResNet | out、aux |
deeplabv3_resnet50、deeplabv3_resnet101 | ResNet | out、aux |
deeplabv3_mobilenet_v3_large | MobileNetV3-Large | out、aux |
lraspp_mobilenet_v3_large | MobileNetV3-Large | out |
它们的预训练权重都是在 COCO 的子集上按 Pascal VOC 的 20 个类别训练的,用法见最后一节
损失函数
像素级交叉熵
分割的交叉熵就是对每个像素分别计算分类的交叉熵,再取平均。F.cross_entropy直接支持多维输入,对形状的要求如下
| 参数 | 形状 | 数据类型 | 说明 |
|---|---|---|---|
input | (N, C, H, W) | 浮点 | 网络输出的 logits,不做 softmax |
target | (N, H, W) | int64 | 类别编号,没有通道维度 |
weight | (C,) | 浮点 | 每个类别的权重,可选 |
1
2
3
4
5
6
7
8
9
10
11
12
13
14
15
16
17
18
19
20
21
22
23
24
25
26
27
28
29
30
31
32
33
34
import torch
import torch.nn.functional as F

torch.manual_seed(0)
logits = torch.randn(2, 4, 64, 64)         # 网络输出 (N, C, H, W),不要先做 softmax
target = torch.randint(0, 4, (2, 64, 64))  # 标签 (N, H, W),int64,取值为类别编号

print(F.cross_entropy(logits, target))

# 常见的形状和类型错误
for name, wrong in [('多了通道维度', target[:, None]), ('uint8', target.to(torch.uint8)), ('float32', target.float())]:
    try:
        F.cross_entropy(logits, wrong)
    except Exception as e:
        print(f'{name}: {type(e).__name__}: {str(e).splitlines()[0]}')

# 忽略标签:把一部分像素标为 255
ignored = target.clone()
ignored[:, :16] = 255
try:
    F.cross_entropy(logits, ignored)
except Exception as e:
    print(f'{type(e).__name__}: {e}')
loss = F.cross_entropy(logits, ignored, ignore_index=255)
print(loss)
# 等价于只在没有被忽略的像素上取平均
per_pixel = F.cross_entropy(logits, ignored, ignore_index=255, reduction='none')  # (N, H, W),被忽略的位置为 0
print(per_pixel.shape, per_pixel[ignored != 255].mean())

# 类别权重:取平均时除以的是权重之和,不是像素数
weight = torch.tensor([0.2, 1.0, 1.0, 1.0])
weighted = F.cross_entropy(logits, target, weight=weight)
per_pixel = F.cross_entropy(logits, target, weight=weight, reduction='none')
print(weighted, per_pixel.sum() / weight[target].sum())
1
2
3
4
5
6
7
8
tensor(1.7180)
多了通道维度: RuntimeError: only batches of spatial targets supported (3D tensors) but got targets of dimension: 4
uint8: RuntimeError: expected scalar type Long but found Byte
float32: RuntimeError: expected target dtype to be Long or Byte, but got Float
IndexError: Target 255 is out of bounds.
tensor(1.7132)
torch.Size([2, 64, 64]) tensor(1.7132)
tensor(1.7150) tensor(1.7150)
- 从数据集中读出的掩码常常是 (N, 1, H, W) 或
uint8,要先squeeze(1)并转成long() - 标签中有 255 而没有设置
ignore_index时会直接报错;ignore_index的默认值是 -100,不是 255,需要显式传入 - 设置了
weight之后,reduction='mean'除以的是这些像素的权重之和,不是像素数
前景很小时
前景只占很小比例时,交叉熵的大部分可以靠把背景预测对来降低。下面构造一个前景只占 0.88% 的二分类例子,比较几种预测下的交叉熵和 Dice 损失。Dice 损失是 1 减去 Dice 系数,对每个类别分别计算再取平均,用概率代替 0/1 的预测使它可导,保存为losses.py
1
2
3
4
5
6
7
8
9
10
11
12
13
14
import torch
import torch.nn.functional as F


def dice_loss(logits, target, ignore_index=255, eps=1.0):
    """logits: (N, C, H, W),target: (N, H, W)。对每个类别计算 Dice,再对类别取平均"""
    num_classes = logits.shape[1]
    valid = target != ignore_index                                # (N, H, W)
    prob = logits.softmax(dim=1) * valid[:, None]                 # 被忽略的像素不参与计算
    onehot = F.one_hot(target * valid, num_classes).permute(0, 3, 1, 2) * valid[:, None]
    inter = (prob * onehot).sum(dim=(0, 2, 3))                    # (C,),在整个批次上求和
    total = prob.sum(dim=(0, 2, 3)) + onehot.sum(dim=(0, 2, 3))
    dice = (2 * inter + eps) / (total + eps)                      # eps 避免某个类别不存在时出现 0/0
    return 1 - dice.mean()
1
2
3
4
5
6
7
8
9
10
11
12
13
14
15
16
17
18
19
20
21
22
23
24
25
26
27
28
29
30
31
32
33
34
import torch
import torch.nn.functional as F

from losses import dice_loss


def report(name, logits, target):
    ce = F.cross_entropy(logits, target, reduction='none')
    accuracy = (logits.argmax(dim=1) == target).float().mean()
    foreground_share = ce[target == 1].sum() / ce.sum()
    print(f'{name}  准确率 {accuracy:.4f}  交叉熵 {ce.mean():.4f}(前景像素贡献 {foreground_share:.1%})  Dice 损失 {dice_loss(logits, target):.4f}')


# 二分类,64x64 的图像中前景只有一个 6x6 的方块,占 0.88%
target = torch.zeros(1, 64, 64, dtype=torch.long)
target[:, 20:26, 20:26] = 1
print(f'{target.float().mean():.4f}')


def make_logits(foreground_mask, margin=8.0):
    """在 foreground_mask 为 True 的位置预测前景,其余位置预测背景,两个类别的 logit 相差 margin"""
    logits = torch.zeros(1, 2, 64, 64)
    logits[:, 0] = torch.where(foreground_mask, -margin / 2, margin / 2)
    logits[:, 1] = -logits[:, 0]
    return logits


half = torch.zeros_like(target, dtype=torch.bool)
half[:, 20:26, 20:23] = True

report('输出均匀  ', torch.zeros(1, 2, 64, 64), target)
report('全预测背景', make_logits(torch.zeros_like(half)), target)
report('找到一半  ', make_logits(half), target)
report('完全正确  ', make_logits(target == 1), target)
1
2
3
4
5
0.0088
输出均匀    准确率 0.9912  交叉熵 0.6931(前景像素贡献 0.9%)  Dice 损失 0.6587
全预测背景  准确率 0.9912  交叉熵 0.0706(前景像素贡献 99.5%)  Dice 损失 0.4889
找到一半    准确率 0.9956  交叉熵 0.0355(前景像素贡献 99.1%)  Dice 损失 0.1730
完全正确    准确率 1.0000  交叉熵 0.0003(前景像素贡献 0.9%)  Dice 损失 0.0093
- 从均匀的输出到全部预测为背景,交叉熵从 0.6931 降到 0.0706,已经走完了 90% 的路,而一个前景像素都没有找到。准确率也已经是 0.9912
- Dice 损失对类别取平均,前景这个类别和背景的权重相同。全预测背景时前景的 Dice 是 0,损失仍有 0.4889
下面在真实的训练中验证这一点:每张 64x64 的图像中只有一个半径为 2 的圆点,前景占 0.32%,分别只用交叉熵和用交叉熵加 Dice 损失训练同一个 U-Net
1
2
3
4
5
6
7
8
9
10
11
12
13
14
15
16
17
18
19
20
21
22
23
24
25
26
27
28
29
30
31
32
33
34
35
36
37
38
39
40
41
42
43
44
45
46
47
48
49
50
import cv2
import numpy as np
import torch
import torch.nn.functional as F

from losses import dice_loss
from unet import UNet


def make_data(length, seed):
    """单通道的噪声图像,每张图像中有一个半径为 2 的圆点,只比背景略亮"""
    rng = np.random.default_rng(seed)
    images = rng.normal(0.3, 0.1, (length, 1, 64, 64)).astype(np.float32)
    masks = np.zeros((length, 64, 64), np.int64)
    for i in range(length):
        cx, cy = (int(v) for v in rng.integers(5, 59, 2))
        dot = cv2.circle(np.zeros((64, 64), np.uint8), (cx, cy), 2, 1, -1)
        images[i, 0][dot == 1] += 0.15
        masks[i] = dot
    return torch.from_numpy(images), torch.from_numpy(masks)


train_images, train_masks = make_data(1024, seed=0)
val_images, val_masks = make_data(256, seed=1)
print(f'前景像素占比 {train_masks.float().mean():.2%}')

for use_dice in [False, True]:
    torch.manual_seed(0)
    model = UNet(in_channels=1, num_classes=2, base=8)
    optimizer = torch.optim.AdamW(model.parameters(), lr=1e-3)
    for step in range(1, 641):
        index = torch.randint(0, len(train_images), (32,))
        model.train()
        logits = model(train_images[index])
        loss = F.cross_entropy(logits, train_masks[index])
        if use_dice:
            loss = loss + dice_loss(logits, train_masks[index])
        optimizer.zero_grad()
        loss.backward()
        optimizer.step()

        if step % 160 == 0:
            model.eval()
            with torch.no_grad():
                pred = model(val_images).argmax(dim=1)
            accuracy = (pred == val_masks).float().mean()
            inter = ((pred == 1) & (val_masks == 1)).sum()
            union = ((pred == 1) | (val_masks == 1)).sum()
            print(f'{"交叉熵 + Dice" if use_dice else "交叉熵       "}  step {step:3d}  '
                  f'像素准确率 {accuracy:.4f}  前景 IoU {inter / union:.4f}  预测为前景的像素 {(pred == 1).sum().item()}')
1
2
3
4
5
6
7
8
9
前景像素占比 0.32%
交叉熵         step 160  像素准确率 0.9968  前景 IoU 0.0056  预测为前景的像素 58
交叉熵         step 320  像素准确率 0.9968  前景 IoU 0.0000  预测为前景的像素 0
交叉熵         step 480  像素准确率 0.9968  前景 IoU 0.0000  预测为前景的像素 0
交叉熵         step 640  像素准确率 0.9968  前景 IoU 0.0000  预测为前景的像素 0
交叉熵 + Dice  step 160  像素准确率 0.9968  前景 IoU 0.0565  预测为前景的像素 377
交叉熵 + Dice  step 320  像素准确率 0.9969  前景 IoU 0.4753  预测为前景的像素 5791
交叉熵 + Dice  step 480  像素准确率 0.9984  前景 IoU 0.6205  预测为前景的像素 3627
交叉熵 + Dice  step 640  像素准确率 0.9992  前景 IoU 0.7859  预测为前景的像素 3412
只用交叉熵时,模型很快退化成把所有像素都预测为背景,像素准确率停在 0.9968,正好等于背景所占的比例。加上 Dice 损失后,前景 IoU 达到 0.7859。把随机种子换成 1 和 2 再各跑一次,只用交叉熵时 3 次中有 1 次在 640 步时学到了前景(IoU 0.5672),另外 2 次都是全预测背景;加上 Dice 损失的 3 次分别为 0.7859、0.7426、0.7440
处理前景过少的常用方法:
| 方法 | 做法 |
|---|---|
| 交叉熵 + Dice | 两者直接相加,交叉熵提供稳定的逐像素梯度,Dice 照顾小类别 |
| 类别权重 | cross_entropy的weight,常取类别频率的倒数或其平方根 |
| Focal Loss | 降低已经分对的像素的权重,见Object Detection |
| 采样 | 裁剪训练图像时优先选择包含前景的区域 |
Dice 损失单独使用时训练初期不稳定,实践中最常见的组合是交叉熵加 Dice。上一节形状数据集的前景约占 8%,并不算极端,在同样的设置下只用交叉熵训练 8 个 epoch 的 mIoU 为 0.9727,只用 Dice 为 0.9713,两者相加为 0.9742,差别不大
训练
训练循环与分类任务相同(DataLoader 的写法见PyTorch Data Loading,优化器、学习率调度的写法见PyTorch Training),区别只在于输出和标签都是逐像素的。在形状数据集上用交叉熵加 Dice 损失训练 8 个 epoch,每个 epoch 结束后在验证集上累积混淆矩阵,计算像素准确率和 mIoU
1
2
3
4
5
6
7
8
9
10
11
12
13
14
15
16
17
18
19
20
21
22
23
24
25
26
27
28
29
30
31
32
33
34
35
36
37
38
39
40
41
42
43
44
45
46
47
48
49
50
51
52
53
54
55
56
import json

import torch
import torch.nn.functional as F
from torch.utils.data import DataLoader

from losses import dice_loss
from shapes import CLASSES, ShapesDataset
from unet import UNet


@torch.no_grad()
def evaluate(model, loader, num_classes):
    """累积整个验证集的混淆矩阵,返回像素准确率和各类别的 IoU"""
    model.eval()
    matrix = torch.zeros(num_classes, num_classes, dtype=torch.long)  # 行是真实类别,列是预测类别
    for images, masks in loader:
        preds = model(images).argmax(dim=1)
        matrix += torch.bincount(masks.flatten() * num_classes + preds.flatten(),
                                 minlength=num_classes ** 2).view(num_classes, num_classes)
    tp = matrix.diag()
    accuracy = tp.sum() / matrix.sum()
    iou = tp / (matrix.sum(0) + matrix.sum(1) - tp)
    return accuracy.item(), iou


if __name__ == '__main__':
    torch.manual_seed(0)
    train_loader = DataLoader(ShapesDataset(1600, seed=0), batch_size=32, shuffle=True)
    val_loader = DataLoader(ShapesDataset(400, seed=1), batch_size=100)

    epochs = 8
    model = UNet(num_classes=len(CLASSES))
    optimizer = torch.optim.AdamW(model.parameters(), lr=3e-3, weight_decay=1e-4)
    scheduler = torch.optim.lr_scheduler.OneCycleLR(optimizer, max_lr=3e-3, total_steps=epochs * len(train_loader))

    history = { 'loss': [], 'accuracy': [], 'miou': [], 'iou': [] }
    for epoch in range(epochs):
        model.train()
        for images, masks in train_loader:
            logits = model(images)  # (N, 4, 64, 64)
            loss = F.cross_entropy(logits, masks) + dice_loss(logits, masks)
            optimizer.zero_grad()
            loss.backward()
            optimizer.step()
            scheduler.step()
            history['loss'].append(loss.item())

        accuracy, iou = evaluate(model, val_loader, len(CLASSES))
        history['accuracy'].append(accuracy)
        history['miou'].append(iou.mean().item())
        history['iou'].append(iou.tolist())
        print(f'epoch {epoch + 1:2d}  loss {loss.item():.4f}  像素准确率 {accuracy:.4f}  mIoU {iou.mean():.4f}')

    torch.save(model.state_dict(), 'unet.pt')
    json.dump(history, open('history.json', 'w'))
1
2
3
4
5
6
7
8
epoch  1  loss 2.0852  像素准确率 0.2488  mIoU 0.0705
epoch  2  loss 1.2556  像素准确率 0.9706  mIoU 0.7449
epoch  3  loss 0.1984  像素准确率 0.9911  mIoU 0.8255
epoch  4  loss 0.0903  像素准确率 0.9983  mIoU 0.9691
epoch  5  loss 0.0497  像素准确率 0.9981  mIoU 0.9649
epoch  6  loss 0.0401  像素准确率 0.9986  mIoU 0.9731
epoch  7  loss 0.0370  像素准确率 0.9986  mIoU 0.9741
epoch  8  loss 0.0404  像素准确率 0.9986  mIoU 0.9742
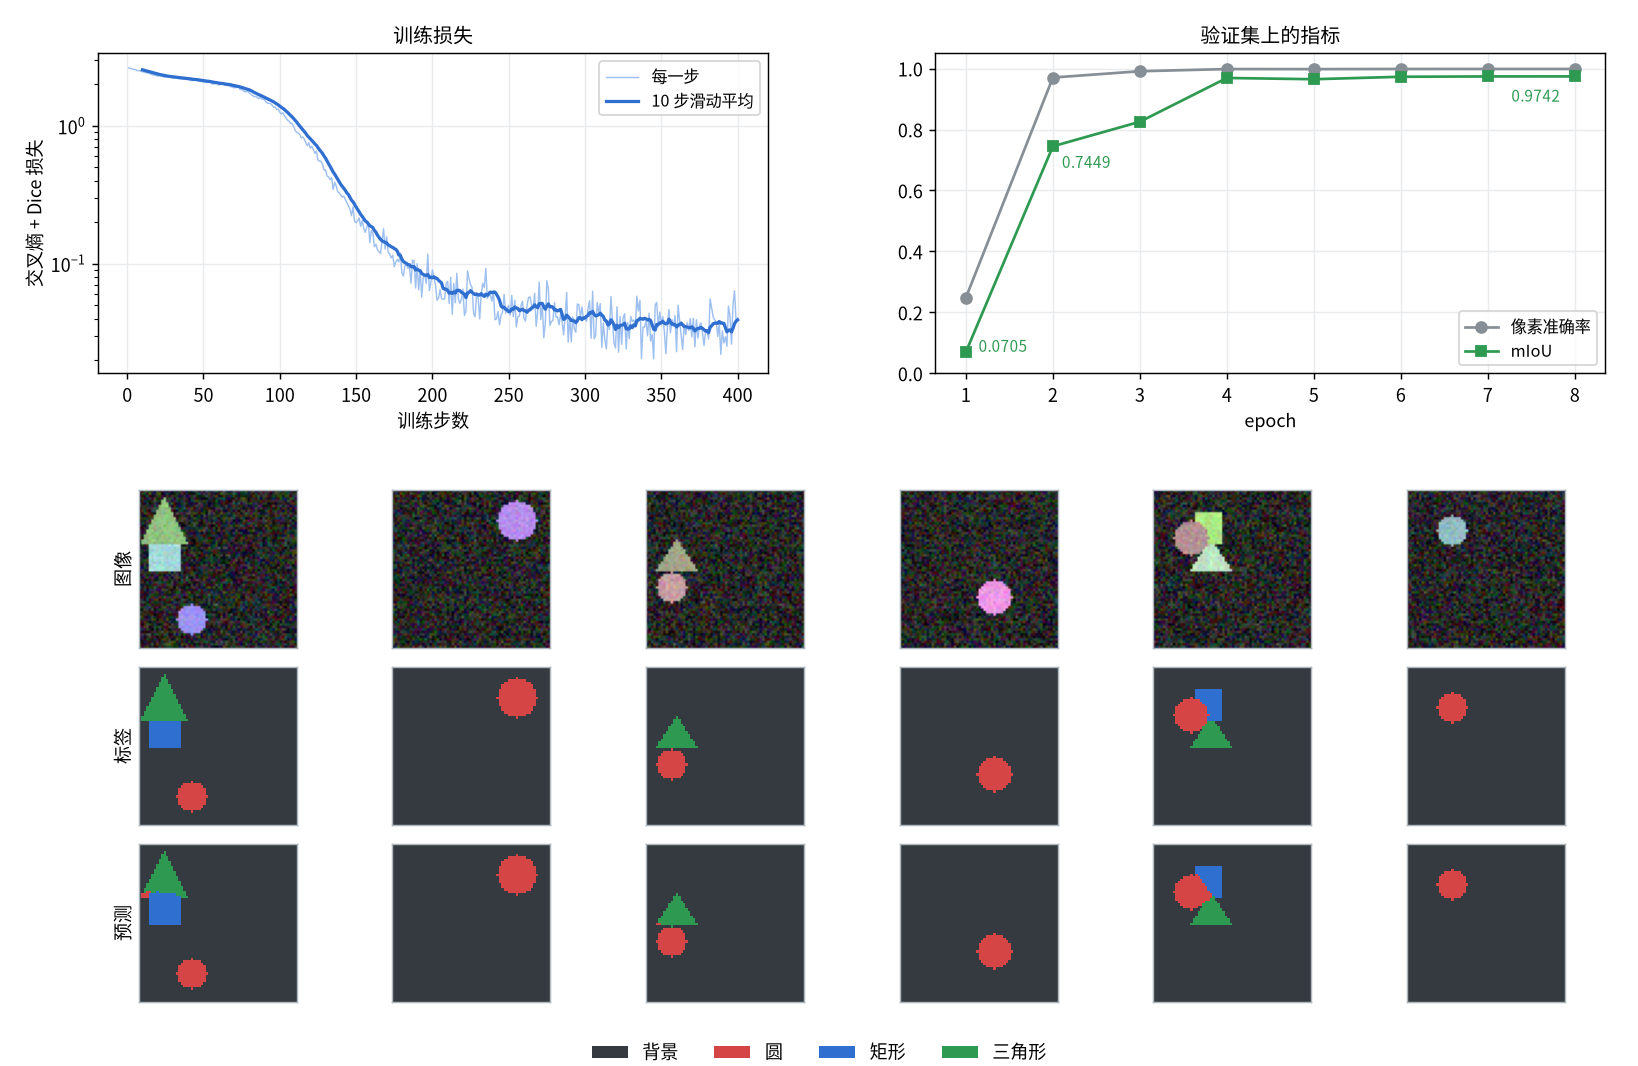
第 2 个 epoch 结束时像素准确率已经是 0.9706,mIoU 只有 0.7449;第 3 个 epoch 像素准确率 0.9911,看起来几乎完美,mIoU 仍只有 0.8255。预测结果中的错误主要在图形的边缘和两个图形相互遮挡的地方
评价指标
IoU、Dice 和 mIoU 的定义、由混淆矩阵计算 mIoU 的方法见Evaluation Metrics。这里用训练好的模型比较三个指标,并加上一个把所有像素都预测为背景的基线
1
2
3
4
5
6
7
8
9
10
11
12
13
14
15
16
17
18
19
20
21
22
23
24
25
26
27
28
29
30
31
32
33
34
35
36
37
38
import torch
from torch.utils.data import DataLoader

from shapes import CLASSES, ShapesDataset
from unet import UNet

num_classes = len(CLASSES)
model = UNet(num_classes=num_classes)
model.load_state_dict(torch.load('unet.pt'))
model.eval()

loader = DataLoader(ShapesDataset(400, seed=1), batch_size=100)


def metrics(matrix):
    tp = matrix.diag().float()
    accuracy = tp.sum() / matrix.sum()
    iou = tp / (matrix.sum(0) + matrix.sum(1) - tp)
    dice = 2 * tp / (matrix.sum(0) + matrix.sum(1))
    return accuracy, iou, dice


# 在整个验证集上累积两个混淆矩阵:一个是模型的预测,一个是把所有像素都预测为背景
matrix = torch.zeros(num_classes, num_classes, dtype=torch.long)
baseline = torch.zeros(num_classes, num_classes, dtype=torch.long)
with torch.no_grad():
    for images, masks in loader:
        preds = model(images).argmax(dim=1)
        matrix += torch.bincount(masks.flatten() * num_classes + preds.flatten(),
                                 minlength=num_classes ** 2).view(num_classes, num_classes)
        baseline[:, 0] += torch.bincount(masks.flatten(), minlength=num_classes)

print(matrix)
for name, m in [('全预测背景', baseline), ('U-Net', matrix)]:
    accuracy, iou, dice = metrics(m)
    print(f'{name}  像素准确率 {accuracy:.4f}  mIoU {iou.mean():.4f}  平均 Dice {dice.mean():.4f}')
    print('  IoU  ', '  '.join(f'{c} {v:.4f}' for c, v in zip(CLASSES, iou.tolist())))
    print('  Dice ', '  '.join(f'{c} {v:.4f}' for c, v in zip(CLASSES, dice.tolist())))
1
2
3
4
5
6
7
8
9
10
tensor([[1506581,       2,       0,       0],
        [     14,   42629,     412,     136],
        [     27,     597,   58550,     303],
        [     13,     287,     461,   28388]])
全预测背景  像素准确率 0.9195  mIoU 0.2299  平均 Dice 0.2395
  IoU   背景 0.9195  圆 0.0000  矩形 0.0000  三角形 0.0000
  Dice  背景 0.9581  圆 0.0000  矩形 0.0000  三角形 0.0000
U-Net  像素准确率 0.9986  mIoU 0.9742  平均 Dice 0.9869
  IoU   背景 1.0000  圆 0.9671  矩形 0.9702  三角形 0.9594
  Dice  背景 1.0000  圆 0.9833  矩形 0.9849  三角形 0.9793
| 指标 | 全预测背景 | U-Net | 说明 |
|---|---|---|---|
| 像素准确率 | 0.9195 | 0.9986 | 被背景主导,什么都不做也有 0.92 |
| mIoU | 0.2299 | 0.9742 | 每个类别权重相同,能反映前景的好坏 |
| 平均 Dice | 0.2395 | 0.9869 | 与 mIoU 单调对应,数值总是更高 |
- 混淆矩阵中前景之间的混淆(圆被预测为矩形 412 个像素,矩形被预测为圆 597 个像素)远多于前景与背景之间的混淆,说明模型找到了图形的位置,错误主要在相互遮挡处的类别判断
- 报告结果时 mIoU 和平均 Dice 要写明是哪一个,是否包含背景类。去掉背景类后,U-Net 的 mIoU 为三个前景类别的平均值 0.9656
- 指标要在整个验证集上累积混淆矩阵之后再计算,不能对每个批次或每张图像的 mIoU 取平均
推理与后处理
从 logits 到类别图
推理时对类别维度取argmax得到类别图。输入图像常常需要缩放后才能送入网络,结果需要还原到原图尺寸,这时应当先用双线性插值放大 logits,再取argmax;先取argmax再用最近邻插值放大类别图,边界会呈锯齿状
下面用一张 256x256 的图像,把它缩小到训练时的 64x64 再预测,然后还原到原图尺寸,并把结果拆成单个的目标
1
2
3
4
5
6
7
8
9
10
11
12
13
14
15
16
17
18
19
20
21
22
23
24
25
26
27
28
29
30
31
32
33
34
35
36
37
38
39
40
41
42
43
44
45
46
47
48
49
50
51
52
53
54
55
56
57
58
59
60
61
62
63
64
65
66
67
68
69
70
71
72
73
import cv2
import numpy as np
import torch
import torch.nn.functional as F

from shapes import CLASSES
from unet import UNet

# 一张 256x256 的图像:两个圆、两个相邻的矩形、一个三角形
rng = np.random.default_rng(0)
image = rng.integers(0, 80, (256, 256, 3)).astype(np.uint8)
truth = np.zeros((256, 256), np.uint8)
for cls, color, draw in [
    (1, (235, 150, 60), lambda m: cv2.circle(m, (56, 56), 28, 1, -1)),
    (1, (120, 200, 230), lambda m: cv2.circle(m, (200, 60), 24, 1, -1)),
    (2, (200, 130, 220), lambda m: cv2.rectangle(m, (24, 150), (88, 214), 1, -1)),
    (2, (230, 220, 120), lambda m: cv2.rectangle(m, (89, 170), (136, 230), 1, -1)),
    (3, (140, 230, 150), lambda m: cv2.fillPoly(m, [np.array([[196, 130], [150, 222], [242, 222]])], 1)),
]:
    shape = draw(np.zeros((256, 256), np.uint8))
    image[shape == 1] = color
    truth[shape == 1] = cls
image = np.clip(image + rng.normal(0, 12, image.shape), 0, 255).astype(np.uint8)

model = UNet(num_classes=len(CLASSES))
model.load_state_dict(torch.load('unet.pt'))
model.eval()

# 模型在 64x64 的图像上训练,先把图像缩小再送入网络
small = cv2.resize(image, (64, 64), interpolation=cv2.INTER_AREA)
x = torch.from_numpy(small).permute(2, 0, 1).float()[None] / 255
with torch.no_grad():
    logits = model(x)  # (1, 4, 64, 64)


def mean_iou(pred, truth, num_classes=4):
    ious = [((pred == c) & (truth == c)).sum() / ((pred == c) | (truth == c)).sum() for c in range(num_classes)]
    return float(np.mean(ious))


# 做法 1:先把 logits 用双线性插值放大到原图尺寸,再取 argmax
upsampled = F.interpolate(logits, size=(256, 256), mode='bilinear', align_corners=False)
pred = upsampled.argmax(dim=1)[0].numpy().astype(np.uint8)  # (256, 256)
# 做法 2:先取 argmax,再把类别图用最近邻插值放大
coarse = logits.argmax(dim=1)[0].numpy().astype(np.uint8)   # (64, 64)
pred_nearest = cv2.resize(coarse, (256, 256), interpolation=cv2.INTER_NEAREST)
print(f'放大 logits   mIoU {mean_iou(pred, truth):.4f}')
print(f'放大类别图    mIoU {mean_iou(pred_nearest, truth):.4f}')


# 连通域:把每个类别的二值掩码拆成互不相连的区域
instances = []
for cls in range(1, len(CLASSES)):
    binary = (pred == cls).astype(np.uint8)
    count, labels, stats, centroids = cv2.connectedComponentsWithStats(binary, connectivity=8)
    for i in range(1, count):  # 编号 0 是这张二值图的背景
        x0, y0, w, h, area = stats[i].tolist()
        if area < 50:          # 丢弃零碎的小区域
            continue
        # 轮廓:区域边界上的点,形状为 (点数, 1, 2),坐标顺序为 (x, y)
        contours, _ = cv2.findContours((labels == i).astype(np.uint8), cv2.RETR_EXTERNAL, cv2.CHAIN_APPROX_SIMPLE)
        instances.append((cls, (x0, y0, w, h), area, contours[0]))
        print(f'{CLASSES[cls]}  框 (x, y, w, h) = {(x0, y0, w, h)}  面积 {area}  轮廓点数 {len(contours[0])}')

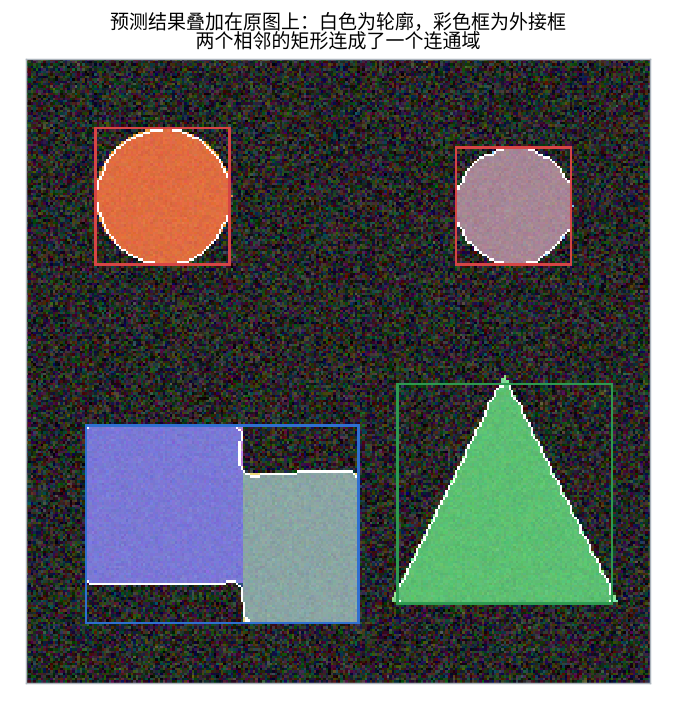
# 叠加显示:前景像素与类别颜色各占一半,再画出轮廓和外接框
palette = np.array([[0, 0, 0], [214, 69, 69], [47, 111, 208], [46, 153, 80]], np.uint8)  # 每个类别的 RGB 颜色
overlay = image.copy()
foreground = pred > 0
overlay[foreground] = (0.5 * image[foreground] + 0.5 * palette[pred][foreground]).astype(np.uint8)
for cls, (x0, y0, w, h), area, contour in instances:
    cv2.drawContours(overlay, [contour], -1, (255, 255, 255), 1)
    cv2.rectangle(overlay, (x0, y0), (x0 + w - 1, y0 + h - 1), palette[cls].tolist(), 1)
cv2.imwrite('overlay.png', cv2.cvtColor(overlay, cv2.COLOR_RGB2BGR))  # OpenCV 按 BGR 顺序保存
1
2
3
4
5
6
放大 logits   mIoU 0.9758
放大类别图    mIoU 0.9479
圆  框 (x, y, w, h) = (28, 28, 56, 57)  面积 2440  轮廓点数 84
圆  框 (x, y, w, h) = (176, 36, 48, 49)  面积 1859  轮廓点数 53
矩形  框 (x, y, w, h) = (24, 150, 113, 82)  面积 7261  轮廓点数 35
三角形  框 (x, y, w, h) = (152, 133, 89, 91)  面积 4444  轮廓点数 116
- 放大 logits 的 mIoU 为 0.9758,放大类别图为 0.9479。logits 是连续的,插值后再比较大小,相当于在像素之间估计边界的位置
- 每个类别的二值掩码用
cv2.connectedComponentsWithStats拆成连通域,stats的每一行是[x, y, w, h, 面积],可以直接作为检测框使用。面积过小的连通域通常是噪声,按阈值丢弃 cv2.findContours返回每个区域的边界点,用于绘制、计算周长或转换成多边形格式的标注- 两个相邻的矩形被合并成了一个连通域(框的宽度为 113)。语义分割本身不区分同类的不同个体,相互接触的同类目标无法靠连通域拆开,需要实例分割
常用的后处理
| 操作 | 做法 | 用途 |
|---|---|---|
| 去除小区域 | 连通域面积小于阈值的改为背景 | 去掉零散的误检 |
| 填充孔洞 | 形态学闭运算(cv2.morphologyEx) | 让掩码内部连续 |
| 置信度阈值 | softmax 的最大值低于阈值的像素标为不确定 | 只保留有把握的结果 |
| 掩码转多边形 | cv2.findContours后用cv2.approxPolyDP简化 | 导出标注、矢量化 |
使用预训练模型
torchvision.models.segmentation中的模型返回一个字典,out是主输出,aux是训练时用于辅助损失的分支,推理时只用out。权重对象中带有类别列表和预处理方式。下面用 scikit-learn 自带的两张示例图像测试fcn_resnet50
1
2
3
4
5
6
7
8
9
10
11
12
13
14
15
16
17
18
19
20
21
22
23
24
25
26
27
28
import torch
import torch.nn.functional as F
from sklearn.datasets import load_sample_image
from torchvision.models.segmentation import FCN_ResNet50_Weights, fcn_resnet50

weights = FCN_ResNet50_Weights.DEFAULT
model = fcn_resnet50(weights=weights)
model.eval()

categories = weights.meta['categories']
print(len(categories), categories)
preprocess = weights.transforms()  # 缩放到短边 520,除以 255,按 ImageNet 的均值和标准差归一化
print(preprocess)

for name in ['china.jpg', 'flower.jpg']:
    image = torch.from_numpy(load_sample_image(name).copy()).permute(2, 0, 1)  # (3, 427, 640) uint8
    batch = preprocess(image).unsqueeze(0)
    with torch.no_grad():
        output = model(batch)  # 一个字典
    print(name, tuple(image.shape), '->', tuple(batch.shape), { k: tuple(v.shape) for k, v in output.items() })

    # 把 logits 缩放回原图尺寸,再取类别和置信度
    logits = F.interpolate(output['out'], size=image.shape[-2:], mode='bilinear', align_corners=False)
    confidence, pred = logits.softmax(dim=1).max(dim=1)  # 均为 (1, 427, 640)
    counts = torch.bincount(pred.flatten(), minlength=len(categories))
    for index in counts.nonzero().flatten().tolist():
        print(f'  {index:2d} {categories[index]:15s} {counts[index].item():6d} 像素  {counts[index] / pred.numel():6.2%}'
              f'  平均置信度 {confidence[pred == index].mean():.3f}')
1
2
3
4
5
6
7
8
9
10
11
12
13
21 ['__background__', 'aeroplane', 'bicycle', 'bird', 'boat', 'bottle', 'bus', 'car', 'cat', 'chair', 'cow', 'diningtable', 'dog', 'horse', 'motorbike', 'person', 'pottedplant', 'sheep', 'sofa', 'train', 'tvmonitor']
SemanticSegmentation(
    resize_size=[520]
    mean=[0.485, 0.456, 0.406]
    std=[0.229, 0.224, 0.225]
    interpolation=InterpolationMode.BILINEAR
)
china.jpg (3, 427, 640) -> (1, 3, 520, 779) {'out': (1, 21, 520, 779), 'aux': (1, 21, 520, 779)}
   0 __background__  273277 像素  100.00%  平均置信度 0.991
   4 boat                 3 像素   0.00%  平均置信度 0.494
flower.jpg (3, 427, 640) -> (1, 3, 520, 779) {'out': (1, 21, 520, 779), 'aux': (1, 21, 520, 779)}
   0 __background__  237647 像素  86.96%  平均置信度 0.922
  16 pottedplant      35633 像素  13.04%  平均置信度 0.637
- 类别列表只有 Pascal VOC 的 20 个类别加背景。
china.jpg是一座中式建筑,这 20 个类别中没有建筑,模型把几乎所有像素都判为背景,只有 3 个像素被判为船 flower.jpg是一朵花,模型把花的大部分区域判为最接近的类别 pottedplant(盆栽),平均置信度只有 0.637,远低于背景的 0.922- 输出的高度和宽度与预处理后的输入相同(520x779),不是原图的尺寸,要先把 logits 缩放回原图再取
argmax - 预训练模型只能识别训练时的类别。要分割自己的类别,保留骨干网络,把最后一层分类卷积换成新的类别数再微调,方法见PyTorch Fine-Tuning