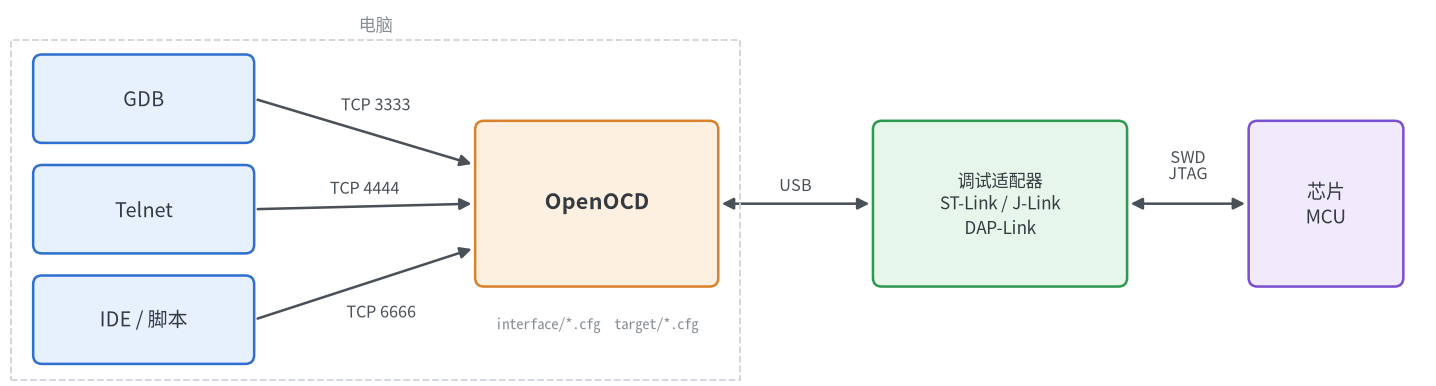
OpenOCD是一个用来调试嵌入式 SOC 的软件,需要搭配debug adapter(如 J-Link,ST-Link,DAP-Link)和 GDB(或 Telnet)一起使用
Linux 安装 OpenOCD
apt仓库中的openocd更新较慢,需要较新的芯片或调试器支持时,选择从源码编译
1
2
| git clone https://github.com/openocd-org/openocd.git
cd openocd
|
相关环境安装
基础环境
1
2
| sudo apt install -y build-essential git make libtool pkg-config
sudo apt install -y autoconf automake texinfo libjim-dev
|
USB 适配器驱动
1
| sudo apt install -y libusb-1.0-0-dev
|
USB-Blaster、ASIX Presto、OpenJTAG 驱动
1
| sudo apt install -y libftdi1-dev
|
CMSIS-DAP 驱动
1
| sudo apt install -y libhidapi-dev
|
linuxgpiod 驱动
1
| sudo apt install -y libgpiod-dev
|
J-Link 驱动
1
| sudo apt install -y libjaylink-dev
|
额外环境
1
| sudo apt install -y libcapstone-dev perl
|
编译源码
在openocd源码目录,执行以下命令配置软件包
1
2
| ./bootstrap
./configure
|
如果全套安装的话,执行完./configure最后会显示如下内容
缺少相关驱动的话相关debug adapter的后面则是no,最后
1
2
| make -j$(nproc)
sudo make install
|
此时使用openocd -v则可查看openocd的版本
但是还没完,此时的openocd需要sudo才能使用,如果要免sudo的话需要额外添加udev规则
添加 udev 规则
在openocd源码目录下,将自带的contrib/60-openocd.rules复制到/etc/udev/rules.d路径下,并将当前用户加入plugdev组(需重新登录后生效)
1
2
| sudo cp contrib/60-openocd.rules /etc/udev/rules.d/
sudo usermod -aG plugdev $USER
|
最后更新udev规则
1
2
| sudo udevadm control --reload-rules
sudo udevadm trigger
|
此时openocd可以免sudo连接单片机
一键安装及配置脚本 ,将脚本置于openocd源码目录下即可使用
连接芯片
openocd通过-f指定配置文件,至少需要一个调试器配置(interface)和一个芯片配置(target),自带的配置文件位于/usr/local/share/openocd/scripts
1
2
| ls /usr/local/share/openocd/scripts/interface
ls /usr/local/share/openocd/scripts/target
|
以 STM32F1 为例
1
| openocd -f interface/stlink.cfg -f target/stm32f1x.cfg
|
1
| openocd -f interface/cmsis-dap.cfg -f target/stm32f1x.cfg
|
1
| openocd -f interface/jlink.cfg -c "transport select swd" -f target/stm32f1x.cfg
|
连接成功后openocd保持运行,并监听以下端口
| 端口 | 用途 |
|---|
| 3333 | GDB 调试 |
| 4444 | Telnet 命令行 |
| 6666 | Tcl 远程调用 |
固定使用的参数可以写入工程目录下的openocd.cfg,之后直接执行openocd即可
1
2
| source [find interface/stlink.cfg]
source [find target/stm32f1x.cfg]
|
烧录程序
1
2
| openocd -f interface/stlink.cfg -f target/stm32f1x.cfg \
-c "program build/firmware.elf verify reset exit"
|
烧录bin文件时需要指定起始地址,如program build/firmware.bin 0x08000000 verify reset exit
GDB 调试
保持openocd运行,另开一个终端启动 GDB,并加载带调试信息的elf文件
1
2
| sudo apt install -y gdb-multiarch
gdb-multiarch build/firmware.elf
|
1
2
3
4
5
| (gdb) target extended-remote :3333
(gdb) monitor reset halt
(gdb) load
(gdb) break main
(gdb) continue
|
monitor后面的内容会原样交给openocd执行,常用命令如下
| 命令 | 作用 |
|---|
monitor reset halt | 复位芯片并停在第一条指令 |
monitor reset run | 复位芯片并运行 |
monitor halt | 暂停运行 |
monitor resume | 继续运行 |
Telnet 命令行
不使用 GDB 时,也可以通过 Telnet 直接向openocd发送命令
| 命令 | 作用 |
|---|
reset halt | 复位芯片并停在第一条指令 |
halt / resume | 暂停 / 继续运行 |
reg | 查看寄存器 |
mdw 0x08000000 16 | 从指定地址读取 16 个 32 位字 |
flash write_image erase firmware.elf | 擦除并烧录程序 |
shutdown | 关闭openocd |